The new school year is only a week away, and this means this is the last serious crocheting time I will have for awhile. So, for the past couple weeks I've been going crochet crazy! Here's a quick rundown of what I've worked on.
1) Wolf Dreamer OTH's Umbreon. Still have to finish this one up actually, but I've just got the circles and the eyes left!
2) Baby Elephant. Kind of on a whim while I watched superhero movies, I crocheted up this adorable little elephant. A pretty easy amigurumi pattern with almost no sewing, you attached the ears and legs as you go!
3) A matching hat and cowl set for chilly football games. I made these two from separate patterns, but they look pretty good together. For the hat, I added an extra row of increase (up to 48 sts) because as written it was turning out too small for my already little head.
4) Actually I just made a lot of cowls in general. The sage green cowl was the first time I'd done a foundation sc, and it turned out alright! There's a link to a video posted with the pattern if you've never tried this before either. I made the smaller of the two sizes. The other green cowl was a pattern I made up as my boyfriend and I watched Dollhouse. It's bulky yarn and basically just works alternating rows of sc, hdc, and dc. I may post up a quick pattern at a later date.
5) Colorful coasters! This is another pattern I made up that I will post when I refine and make a few more for my apartment.
6) A crochet bag for my momma! This pattern is available as a Ravelry download.
That is it for now, but stayed tuned for some possible new patterns!
Showing posts with label accessories. Show all posts
Tuesday, August 26, 2014
Craft Splurge!
Labels:
accessories,
bag,
coaster,
cowl,
crochet,
elephant,
hat,
nerdy,
plushie,
pokemon,
quick project,
Ravelry,
school spirit
Saturday, March 1, 2014
Sibling Christmas Gifts
I know, I know, it's March. But this semester's been pretty busy, so cut me a little slack.
I made a lot of the Christmas gifts I gave this year. This post will be dedicated to the gifts I made for my boyfriend's siblings and my brother.
First, I decided to try and tackle the gift for my boyfriend's older brother because I had no idea what I wanted to make. Through some "sneaky" question asking during Thanksgiving I confirmed that he was a Zelda fan. Enter the Triforce hat.
I had to add around seven rows to the end of the pattern, and it was a bit tight, but I was pretty pleased with it over all. And he didn't take it off for a couple weeks, so I think I did good.
For my boyfriend's sister I made armwarmers. It took me awhile to decide which colors to use, but ended up using black and white because they will in theory, match more things.
I made my little brother a hat for his favorite sports team that I unfortunately didn't get to take pictures of. The pattern was my own invention, but I'm going to have to modify it some if I want to make it again! New pattern coming?
I made a lot of the Christmas gifts I gave this year. This post will be dedicated to the gifts I made for my boyfriend's siblings and my brother.
First, I decided to try and tackle the gift for my boyfriend's older brother because I had no idea what I wanted to make. Through some "sneaky" question asking during Thanksgiving I confirmed that he was a Zelda fan. Enter the Triforce hat.
I had to add around seven rows to the end of the pattern, and it was a bit tight, but I was pretty pleased with it over all. And he didn't take it off for a couple weeks, so I think I did good.
For my boyfriend's sister I made armwarmers. It took me awhile to decide which colors to use, but ended up using black and white because they will in theory, match more things.
I made my little brother a hat for his favorite sports team that I unfortunately didn't get to take pictures of. The pattern was my own invention, but I'm going to have to modify it some if I want to make it again! New pattern coming?
Wednesday, December 26, 2012
Christmas Presents
This was my first Christmas while knowing how to crochet, and so needless to say I put this skill to good use!
The scarf is the same infinity scarf pattern I had used before because while I was making the first scarf my mom commented how much she loved it. I really like the yarn I used for this set. I found it in a local yarn shop in a small town about 30 minutes from where I live. My only complaint is that they tied to pieces of yarn together in the middle of the skein! UGH! You can see the awful red to suddenly purple transition in the picture. Luckily you can hardly tell when it's worn.
I used about one and a half skeins for the scarf and so decided to make this headband with the extra. Turns out I had the perfect amount! I created this by using a double crochet stitch with an I hook. It was very quick and easy.
This next set is what I made for a gift exchange at a family Christmas gathering. The rules were that it had to be a unisex gift, so neon orange and neon green totally work, right?
I was tired of making an equal size stripe pattern (plus I had less green than orange) so I decided to try out stripes of different sizes, and I really like how it turned out. Double crochet stitch with an I hook.
Lastly I am making a hat and scarf for each of my grandmas! Below is the hat I have finished.
This was the first time I worked with chunky weight yarn and I didn't realize how much quicker projects take when you use it. Too bad it's more expensive. I used my hat pattern from a previous post, same number of stitches in a round and everything. This made a looser hat, which was my goal.
And because it was Christmas, I had to include a picture with the tree! :)
Infinity scarf post: http://linz-craftingadventures.blogspot.com/2012/11/infinity-scarf-surprise.html
Hat pattern post: http://linz-craftingadventures.blogspot.com/2012/10/neon-green-beanie.html
Above is what I made for my mother.
The scarf is the same infinity scarf pattern I had used before because while I was making the first scarf my mom commented how much she loved it. I really like the yarn I used for this set. I found it in a local yarn shop in a small town about 30 minutes from where I live. My only complaint is that they tied to pieces of yarn together in the middle of the skein! UGH! You can see the awful red to suddenly purple transition in the picture. Luckily you can hardly tell when it's worn.
I used about one and a half skeins for the scarf and so decided to make this headband with the extra. Turns out I had the perfect amount! I created this by using a double crochet stitch with an I hook. It was very quick and easy.
This next set is what I made for a gift exchange at a family Christmas gathering. The rules were that it had to be a unisex gift, so neon orange and neon green totally work, right?
Matching hat and scarf! As you can see, I didn't exactly finish before my family had to leave... However, I did manage to barely get it done in time. Whew!
I was tired of making an equal size stripe pattern (plus I had less green than orange) so I decided to try out stripes of different sizes, and I really like how it turned out. Double crochet stitch with an I hook.
Lastly I am making a hat and scarf for each of my grandmas! Below is the hat I have finished.
This was the first time I worked with chunky weight yarn and I didn't realize how much quicker projects take when you use it. Too bad it's more expensive. I used my hat pattern from a previous post, same number of stitches in a round and everything. This made a looser hat, which was my goal.
And because it was Christmas, I had to include a picture with the tree! :)
Infinity scarf post: http://linz-craftingadventures.blogspot.com/2012/11/infinity-scarf-surprise.html
Hat pattern post: http://linz-craftingadventures.blogspot.com/2012/10/neon-green-beanie.html
Sunday, November 4, 2012
Infinity Scarf Surprise
She has no idea yet, but as a frequent reader of my blog she'll find out soon. My best friend of 13 years is an absolutely amazing person, and significantly more fashionable than I am. I hadn't created anything for her yet and I'd been seeing a lot of infinity scarves around campus lately and they look like something she would absolutely love. So combining this pattern (http://yarnchick.blogspot.com/2011/10/simple-shell-stitch-infinity-scarf-free.html) with some black, sparkly yarn will do the trick! :)
I really liked this pattern because of the shell stitch. It's unique and the scarf pattern almost has a vintage feel to it (as described by my boss). If you were to undo the scarf so that is was straight, it's approximately four and a half feet long.
Hey, look, it's a vertical infinity symbol!
The great thing about this pattern is that pretty much every female I've shown it to has said how pretty or neat it is!
So...surprise, Natalie :) Thanks for being an amazing friend!
I really liked this pattern because of the shell stitch. It's unique and the scarf pattern almost has a vintage feel to it (as described by my boss). If you were to undo the scarf so that is was straight, it's approximately four and a half feet long.
Hey, look, it's a vertical infinity symbol!
The great thing about this pattern is that pretty much every female I've shown it to has said how pretty or neat it is!
So...surprise, Natalie :) Thanks for being an amazing friend!
Sunday, September 2, 2012
Hogwarts House Color Bracelets
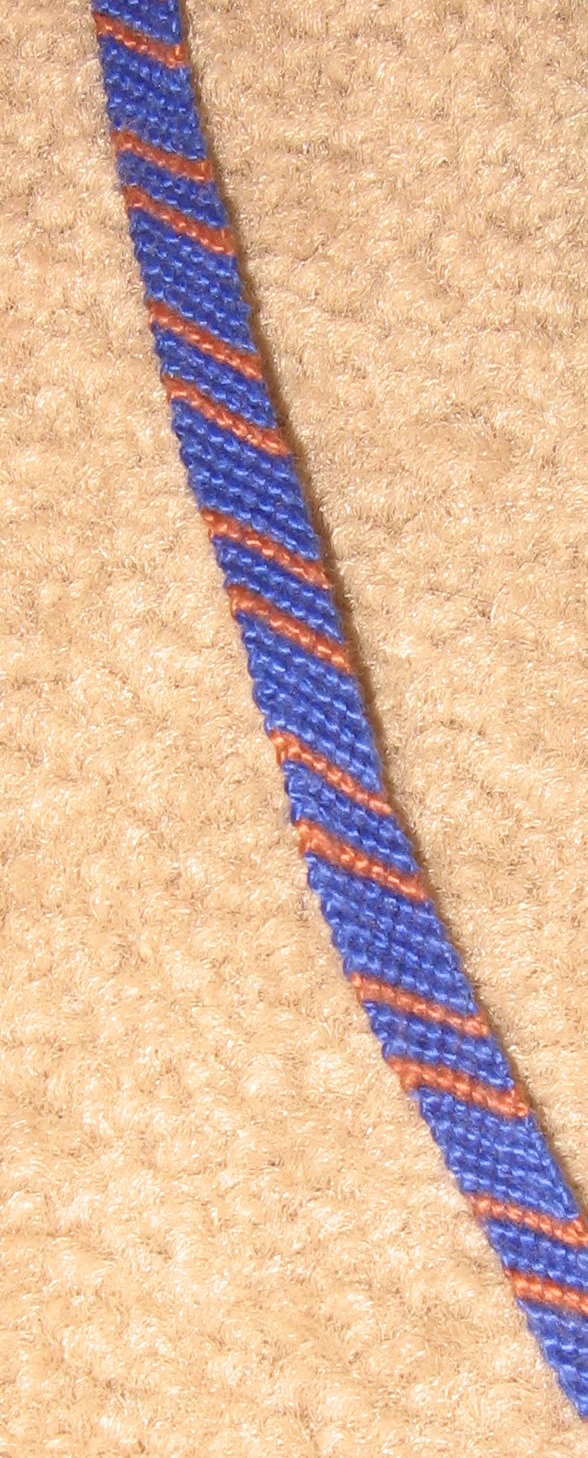
Finally, finally, finally, I am proud to present my Hogwarts bracelets!
This is a very simple design and so they were not difficult to make, I just needed the idea. This is the standard flat friendship bracelet style. In the order of how you want the colors to appear in the bracelet you make two knots with the beginning string on each of the following strings from left to right and then repeat with the next string on the outermost left. That is a very bad explanation so here is a better tutorial of the basic idea: http://www.dltk-kids.com/crafts/friendship/mbracelets.htm
The bracelets were made with 4 strings folded in half to give us 8 pieces of string to knot with: 3 of the base color and 1 of the accent color. The pattern I used was: 2 rows base, 1 row accent, 2 rows base, 1 row accent, 2 rows base (and repeat).
The following colors were used for the houses:
If there is any confusion (which I'm sure there will be) or if there are any questions, feel free to leave a comment and I will address it!
This is a very simple design and so they were not difficult to make, I just needed the idea. This is the standard flat friendship bracelet style. In the order of how you want the colors to appear in the bracelet you make two knots with the beginning string on each of the following strings from left to right and then repeat with the next string on the outermost left. That is a very bad explanation so here is a better tutorial of the basic idea: http://www.dltk-kids.com/crafts/friendship/mbracelets.htm
The bracelets were made with 4 strings folded in half to give us 8 pieces of string to knot with: 3 of the base color and 1 of the accent color. The pattern I used was: 2 rows base, 1 row accent, 2 rows base, 1 row accent, 2 rows base (and repeat).
The following colors were used for the houses:
Gryffindor: Scarlet and Gold
Ravenclaw: Blue and Bronze
Slytherin: Green and Silver
Hufflepuff: Yellow and Black
If there is any confusion (which I'm sure there will be) or if there are any questions, feel free to leave a comment and I will address it!
Thursday, August 16, 2012
Flower Beads
I was cleaning my room recently (I know, big shock!) and came across a bunch of old jewelry, including these anklets.
Now I've had these since I went to Mexico when I was in grade school and I always thought they were really cool so I thought, hey, maybe I should try to learn to make them.
Above is my first attempt! Pretty good I think, although a lot larger scale than the originals.
I figure it's initially easier to work with larger beads in order to fully understand the pattern. That way, when you have to work with seed beads you can actually know what's going on without straining your eyes too much!
I think that the larger flowers will probably become a key chain because I'm personally not that into chunky jewelry. I am working on a bracelet with this style right now and so I'll post that when I finish! And since this bracelet is pretty cool I'll try to write a pattern of sorts to share with y'all on the interwebs.
Update (8/20/12): Here's my completed seed-bead sized bracelet!
Now I've had these since I went to Mexico when I was in grade school and I always thought they were really cool so I thought, hey, maybe I should try to learn to make them.
Above is my first attempt! Pretty good I think, although a lot larger scale than the originals.
I figure it's initially easier to work with larger beads in order to fully understand the pattern. That way, when you have to work with seed beads you can actually know what's going on without straining your eyes too much!
I think that the larger flowers will probably become a key chain because I'm personally not that into chunky jewelry. I am working on a bracelet with this style right now and so I'll post that when I finish! And since this bracelet is pretty cool I'll try to write a pattern of sorts to share with y'all on the interwebs.
Update (8/20/12): Here's my completed seed-bead sized bracelet!
Full bracelet
Close-up of the pattern
Close-up of the clasp
A special thanks to my friend for whom this was made: she gave me all the materials! The beads were strung on beading wire and the clasp is a clip clasp (I believe that's correct). It took about 3 hours, but it takes less and less time as you get closer to the end. I would not recommend using beading wire though because it was very difficult to start the bracelet because the wire was too strong. I haven't had time to make a pattern yet, but I will put it up as soon as I have!
Button Bracelets
Long time no see! I promise during my long disappearance I continued to work on some small projects; get ready for several close-succession posts!
These are the two bracelets that I made for myself. Each bracelet uses three hemp strings through each hole. It is a little difficult to get all three through without having some fraying, but in the end the band looks nicer because piece you braid with has the same number of strings.
Over the summer I taught my three roommates to make friendship & hemp bracelets. One of them saw a bracelet on Pinterest that used a button as a center piece and challenged me to learn how to make it. Although I changed the style slightly, I really like the result.
These are the two bracelets that I made for myself. Each bracelet uses three hemp strings through each hole. It is a little difficult to get all three through without having some fraying, but in the end the band looks nicer because piece you braid with has the same number of strings.
The most difficult part of the bracelet is definitely the knot at the end with the clasp button. For mine I ended up threading two of the strings in and out of the clasp button. Then, I tied the knot right underneath the button using all of the strings. It's important to tie the knot as close to the button as possible to keep the threads in the button from wearing out as fast.
Although I braided my bands there are a lot more options. My roommate knotted the band of one of her bracelets like you would a friendship bracelet, so there's lots of room for experimenting! If anyone makes a button bracelet and creates a band a different way I'd love to see it!
Monday, June 4, 2012
Headbands Galore!
Woo-hoo, new project!
All colors and sizes!
Toning it down a little bit...Here are some lovely headbands that I made. I'm told they're fashionable by people that are, so I decided to trust them (I know literally nothing about fashion.) This was a very simple project, after I learned the double crochet stitch used in the pattern. Each headband took around 4 hours to complete, and that might be an over-exaggeration. This piece is made in two parts; the band and the knot.
Here's a little closer shot of the knots.
I found the pattern for the headband here: http://allaboutami.tumblr.com/post/18110601640/knottedheadband
It was easy to follow, but I must crochet tighter than the author of the pattern because I had to use 75-80 chain stitches for the headband, and about 12 for the knot. Otherwise, I don't have too much to say about this project. I am, however, still working on my Hogwarts bracelets. I've finished Gryffindor, Ravenclaw is ten rows away from being done, and then it's just Hufflepuff and Slytherin left!
Subscribe to:
Posts (Atom)